

Yoga learning | Yoga Tip: Table Top Position
본문
※ 영상을 선명하게 보기 안내
- 유튜브 영상에서 오른쪽하단에 톱니바퀴를 클릭합니다.
- 팝업목록에서 "품질" 선택하세요.
- 원하는 해상도를 선택해주세요.
※ 모바일에서 Wifi가 아니라면 데이타가 소진될 수 있으니 주의바랍니다.
Yoga learning님의 Yoga강의 청각장애인을 위한 자막
What's up, everyone?
Welcome to Yoga with Adriene.
I am Adriene and today I'm tackling a question
about tabletop position for our yoga tips
episode.
I often get a question about this tabletop
position, people wondering if they're stacking
the bones right and just not knowing necessarily
if they're doing it right which in this particular
pose I feel you even though we talk about
it's not about doing it right it's about having
an experience I did feel like this one warranted
a little extra chat because we can take the
action and the alignment of tabletop position
into so many other postures.
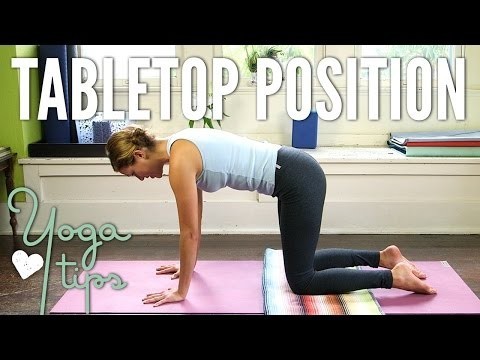
So, we're going to come on to all fours.
I have a little towel or you can get a little
blankie to pad the knees if you want.
And we're going to come into what we think
is that tabletop position.
So we're going to start with the palms.
So, first of all-- and I'm going to do my
best to really talk you through this so you
can watch this one time through and then experience
it but I'm going to do my best to really talk
you through so you can experience this while
the video is playing rather than having to
crank your head the whole time.
So, here we'll take it nice and slow.
This is one of the great things about the
foundations of yoga and these yoga tips is
we can really take the time to really break
it down in public class or even maybe you
only have an hour for home practice or less,
10 minutes, 30 minutes.
You just kind of want to get through beginning,
middle, end, have an experience.
But today we're going to break it down a little
yoga tips yoga school.
Okay, so, we're going to come on to all fours.
We're going to start with the hands.
Hand to earth, Hasta Bandha, as we spread
the palms wide, spread them super wide like
starfish.
So, it really does start here.
There's this kind of thing that happens with
the hand sometimes when we keep them here
or the index finger and thumb get left behind
and we're crashing into the outer edges of
the wrist.
So, really truly spread the palms wide, make
sure you're pressing into that fleshy part
between the index finger and thumb.
There is a tendency here to roll to the outer
edges of the wrist that can cause unnecessary
strain.
So forget about that.
Spread the palms wide, press into all 10 knuckles
then go ahead and shift your shoulders over
your wrist here so if you need to walk the
palms out, go for it.
And we're gonna keep a soft bend in the elbows
as we practice pressing away from the yoga
mat.
So, here is a tendency.. there is a tendency
again to kind of just forget about the hands
crashing to the outer edge, lock the elbows
and shrug the shoulders.
But again just focusing on this part of the
body we're going to press into the palms,
spread the fingertips wide, soften through
the elbows and again press away from the earth.
This is half the battle right here.
Really paying attention to this.
You might begin to rock a little front and
back.
You might, particularly if this is new, begin
to feel a little shake and that prana kind
of vibrating and the arms getting really tired
and this is a good thing.
This means we're working in the right direction.
So, we're building strength and awareness
with proper action and alignment here.
Tops of the shoulders draw away from the ears
again.
Careful not to lock the elbows here and keep
a nice softness and yes, I really feel this
in my arm.
I can feel my left arm trembling a little
bit for whatever reason.
And I'm stacking the bones.
Great.
Now let's pay attention to the head and neck.
So, tendency here is to just forget the neck
is an extension of the spine altogether and
just kind of wait.
Also, Yoga with Adrienne, you're looking at
the video so I try to consider that here so
now's the time where you can take your gaze
from the video and draw it straight down.
Imagine me coming and placing a little teacup
on the back of your neck.
So the neck is nice and long, arms are strong,
we're working here with a lot of integrity.
When you get tired you're gonna want to collapse
your heart down but see if you can stay pressing
away from the mat, finding a little resistance
there.
Great.
So, there's lots of space between the ears
and shoulders here, your gaze is straight
down, chin is tucked in just slightly so again
we're not crunching looking forward, we're
not forgetting about it, that nice, long beautiful
neck.
Then from the crown of the head we light this
fire, this spark, that slowly travels all
the way down through the spine to the tip
of the tailbone right here.
And we're just going to begin to walk the
knees underneath the hips and begin to just
light a little light.
Light a little fire, shine a little light
is what I meant to say, from the crown of
the head to the tip of the tailbone.
And for me rocking a little front and back
helps me find that line and you might notice
that you're dropping the belly here and the
tailbone's rocking up.
Or you might notice if the lower back is really
tight that your pelvis naturally comes in,
kind of arching the back.
So, just see what's going on there and if
you're new to the practice it's starting to
hurt your wrists, you're not used to working
like this, you can take a little break by
coming onto the fists as we explore this posture,
rocking front to back.
Now, if you start to get a little bored, you
feel like your time is getting wasted, just
keep going through your checklist.
There's so much to do here.
Then we'll come back to stillness.
And now we're going to bring our awareness
to the belly button, the navel.
Navel draws up to the spine.
So, here's an exaggeration of dropping the
belly, forgetting about the abdomen, the abdominal
wall, and I'm going to spiral the lower rib
cage in together, lengthen the tailbone towards
my heels and essentially I'm going to draw
the belly button, the navel, suck it up towards
the back body and the spine.
Don't forget about that long, beautiful neck.
And now we're starting to cook with gas as
my mom would say.
Now, notice where your toes are.
So we have the knees underneath the hip points,
just a reminder.
Now, notice where the toes are.
They might have started to come in here or
they might come out.
We might just not have that awareness.
See if you can draw the ankles in line with
the knees and the toes in line with the ankles.
So, all sorts of fun stuff happens back here
and we're going to create nice, strong lines.
We're stacking the bones, knees underneath
the hip points, wrists underneath the shoulders
and we're drawing straight lines from those
knees to press into the tops of the feet.
Now, inhale in.
On an exhale press away from the earth.
Go ahead and slap the tops of your feet down
to the mat, press away from your yoga mat
and find that beautiful, beautiful long line
from the crown of the head to the tip of the
tailbone as you draw your navel up.
So, essentially you can come and have a little
tea party on my back here.
Hey, yo!
Really want to say it, sorry.
Alright, last but not least we're going to
test out this tabletop connection by lifting
the knees, hovering cat.
So, I do this one as a core strengthener but
also as a way of really checking in with all
my lines and all my muscles making sure everything's
along for the ride.
Because when I let my knees hover, oh there
I have to find that abdominal wall, that navel
to spine.
I can't let my shoulder blades shrug in I
have to broaden through the upper back body
to support everything.
And when you feel like you've had enough you
can lower down, curl the toes under and take
a moment and maybe just watch the next portion
if the wrists are tired to maybe relieve any
stress in the wrist.
This does take time.
This does take time and I encourage you to
not write anything off especially if you're
new to yoga.
I feel like for the longest time I kind of
just wrote off that I had bad wrists and then
I kept practicing mindfully and with assistance
from my mentor and it's like now we're good.
And when my wrists start to talk to me I know
to counter that or to take a break and so
don't decide where it ends.
Don't write yourself off.
So, you might just watch this next portion
if you need to take some weight off the wrists
but I just want to go through the lines and
the actions one more time.
So we're pressing up and out of the palms,
all 10 fingerprints, all of the knuckles and
especially the fleshy part between the index
finger and thumb.
Then I'm walking my wrist out just a bit,
the base of my palm out just a bit to make
sure that I have this nice long line from
the top of the shoulder all the way down to
the wrist.
Stacking the bones.
Then I walk the knees underneath the hip points,
nice long line.
And then I walk the ankles in line with the
knees.
I draw the shoulders away from the ears and
I lift up through the center back body.
Find that long, beautiful neck, gaze straight
down then draw your navel up towards your
spine.
Now, to check this one last time we'll press
into our foundation and lift up, just a gentle,
tiny lift up through the knees, just to check
in with that line or that dunda from the crown
of the head to the tip of the tailbone that
stick or that staff that literally holds us
up.
One more breath here and then exhale release.
Curl the toes under maybe we're joining our
friends here, maybe you're taking a moment
to rotate the wrist.
And that's our tabletop tips today.
So, through your practice you'll notice that
the more we strengthen everything in this
kind of tabletop position the more we can
apply this to our standing postures high lunge,
half moon, really all the warriors, plank,
considering this one piece and finding spacing
grace through the limbs.
So, always building our poses from the ground
up.
Thank you so much for your questions.
If you have questions or you want to start
a conversation please leave it in the comment
box below.
Subscribe to the channel if you haven't already
so you don't miss anything and be sure to
visit us at yogawithadriene.com for more free
goodies.
Thank you, my friends.
I love this Kula.
I couldn't be more grateful and more excited
for all of us.
There's so much potential.
So, thank you.
Namaste.
댓글 0개
등록된 댓글이 없습니다.